IBM Planning Analytics for Excel (PAfE) is an Excel add-in that allows users to access and interact with IBM Planning Analytics data directly within Microsoft Excel.
Using PAfE, you can build reports, perform analysis, and complete planning, budgeting and forecasting activities while continuing to work in a familiar Excel environment.
To use Planning Analytics for Excel with Planning Analytics, you first need to download, install, and configure the application.
Administrators can either download PAfE from Fix Central or from within their Planning Analytics environment. As the file is a .xll file, no typical installation is required.
To connect PAfE to your Planning Analytics environment, you will need the connection URL provided in your Planning Analytics Welcome Kit.
For Planning Analytics as a Service environments, the URL is typically in the following format:
https://<your-environment-name>.planning-analytics.cloud.ibm.com
Download via Planning Analytics #
- Log into Planning Analytics as an Administrator.
- Open Administration.
- Select Excel and Customisations.
- Choose the required version of Planning Analytics for Microsoft Excel.
- Click Download Update.
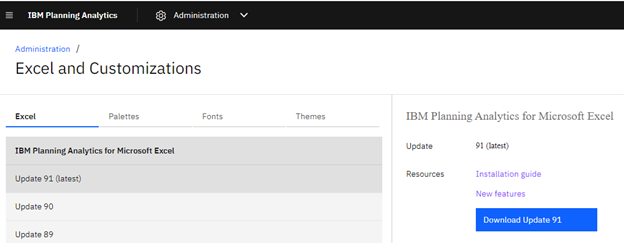
The installation package will be downloaded as a ZIP file.
- Extract the ZIP file.
- Locate the extracted
IBM PAfE_<VERSION>.xllfile
Rename the downloaded file by removing the version number at the end, this will make updating to newer versions easier in the future.
Uninstall an Existing Version of PAfE #
If there is an existing version of Planning Analytics for Excel (PAfE) installed on your machine, you may wish to remove it before installing a newer version.
-
Navigate to the location where the add-in is stored, typically:
C:\Users\<username>\AppData\Roaming\Microsoft\AddIns - Locate the existing PAfE
.xllfile. - Delete the file.
- Open Excel.
You may receive a warning message stating that Excel cannot find the add-in. This is expected and can be dismissed. Once the new version of PAfE has been associated with Excel, the warning will no longer appear.
Add PAfE to Excel #
-
Copy the
.xllfile to your Excel Add-ins folder:C:\Users\<username>\AppData\Roaming\Microsoft\AddIns - Open Microsoft Excel.
- Select File > Options > Add-ins.
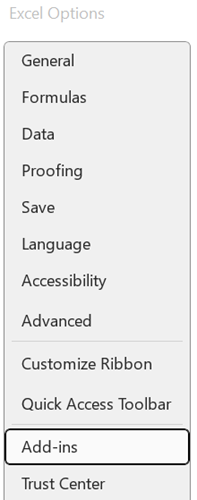
- At the bottom of the window, ensure Manage is set to Excel Add-ins and click Go.

- Click Browse and navigate to the PAfE
.xllfile. - Select the file and click OK.

The .xll will now appear in the ‘Add-ins’ box as ‘IBM Planning Analytics for Excel Addin’:
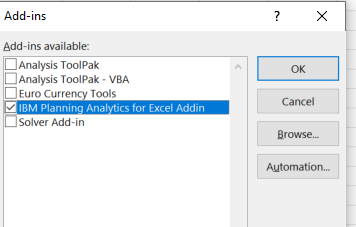
- Confirm that IBM Planning Analytics for Excel Add-in is ticked and click OK.
The IBM Planning Analytics tab will now be available in the Excel ribbon when Excel is opened.

Set up a Connection to Planning Analytics #
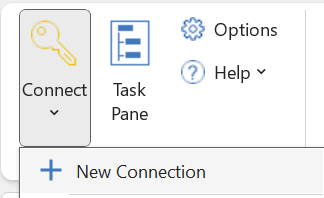
- Click on IBM Planning Analytics tab.
- Select Connect > New Connection.
A blank connection window will appear. Enter the Connection URL supplied in your Planning Analytics Welcome Kit under the heading Planning Analytics for Microsoft Excel.
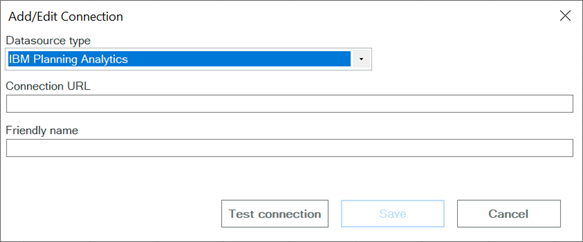
- Add in the Connection URL and a Friendly name and click on ‘Save’ when completed.
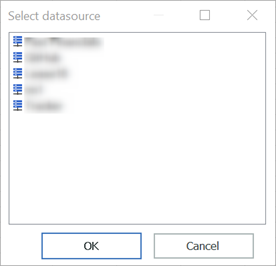
To connect:
- Select the connection from the Connect dropdown.
- Sign in using your IBMid.
- Choose the required Planning Analytics database if prompted.
- Click OK.
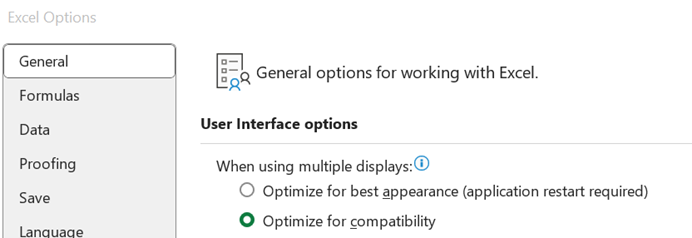
Blank Task Pane #
Some users may encounter a blank Task Pane after connecting to Planning Analytics.
This can sometimes be caused by display compatibility settings within Excel.
To resolve the issue:
- Open Excel.
- Select File > Options.
- Under the General tab, select Optimise for compatibility.
- Close and restart Excel.
The Task Pane should now display correctly.
Additional Resources #
For further information, refer to the IBM Planning Analytics documentation for your deployment type:
If you need assistance installing or configuring PAfE, please contact the Aramar support team.


